Sunday 31 August 2014

Lime Crime,Great Pink Planet - Review

The minute I heard there was a shop in Birmingham that sold lime crime I had to go there and get myself a lipstick. (Even the box is amazing) 
It took us forever to find the shop but eventually we were in digbeth which is about a 5 minute walk from the city and got to custard factory,a cute little street with even cuter looking shops 
But the only place I was interested in getting to was a shop called Cocktail Cosmetics 
It's quite a small shop but it's every makeup lovers dream with brands such a Lime crime,sugar pill,nyx,sigma and occ...I was in love,I want to live there! After spending about half an hour there I finally settled on a few products,one being this Lime Crime lipstick. After spending forever trying to pick a colour I decided to go for something I could wear everyday and I went for Great Pink Planet! 
 
It's such a cute baby pink colour and it reminds me of Mac's Saint Germain lipstick,one of those pinks that just covers all your lips,but I love it! (Sorry for the rubbish swatch of it on my hand and on my lips. I'm not very good with this yet..)
I'm so in love with this colour. Even though it is abit bright I still think it's quite wearable in the day and it's perfect for going out on the evening. I love lime crime products! They're not the cheapest but it's certainly worth paying a little extra to get a better qualitly of product I think. I'll definitely be building up my collection the second I get paid!

Enjoy xx

Monday 25 August 2014

L'oreal True Match - review

Sorry for my lack of posts lately I've just got a new job so I haven't had as much time to be doing posts! But now I'm backkkkk!
I thought for today's post I'd do a review on the L'oreal true match foundation  this stuff seemed to be like a beauty favourite on YouTube and Instagram and I was looking for a new foundation to try and spotted this for £6 in tesco and thought I'd give it a go! I picked mine up in C1 rose ivory as it had more a pink undertone to it which is most suited for my skin. 
I started by applying a moisturiser to the face,I used Clinique even better skin lotion 
And then applied a my primer which today was the Gosh classic primer (quite similar to the smashbox primer for a lot less money!)
I then applied abit of concealer to any imperfections on my face (quite a lot) and for this I used the Mac studio finish in nc20
Finally time for the foundation! I found it quite similar to the the mac moisture mineralise foundation as it's quite thin but it's still very buildable which I like in a foundation and I found the colour was very suited to my skin tone! 
I applied it to the skin with a Real techniques buffing brush and it went on perfectly! (Pleeeeease excuse how awful I look here I definitely need more concealer on here) 
I was really pleased with this foundation,I applied it at about lunch time today and after walking to and from work in the rain it's still perfectly in place,I love it!
I'd defo recommend getting to tesco while it's still on offer,now I know why there's such a hype about it!

Enjoy xx

Wednesday 20 August 2014

Benefit Frisky Six - what's inside

I reckon any girl that's interested in makeup will have a soft spot for Benefit,perfect packaging with every product and the quality of the product is even better. My mum was super kind a purchased the Benefit Frisky Six collection for me on QVC which is on offer for £22.50 at the moment. An absolute bargin for the amount that you get inside. 
Without even opening the set I just fell in love,the colours,the products,just all looks amazing. I haven't actually tried any of the products out on my face yet but I thought I'd give you a look inside at what you get and hopefully you'll fall in love by the end of the post (if you haven't fallen in love already)
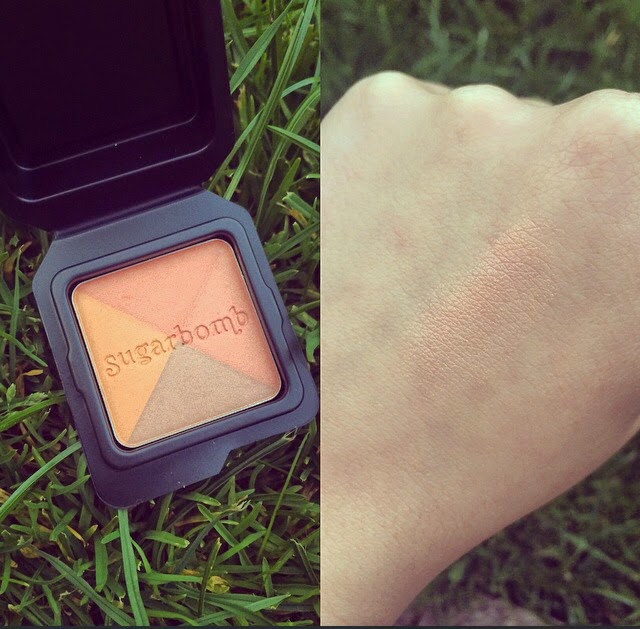
Sugarbomb Blush - I've only ever tried two of benefits cheek products so I was super excited when I saw this. The number one selling blush is split into four different shimmering colour sections of peach, soft plum, pink and rose they can either be used alone or mix together to give a natural radiant look to the cheeks. It was quite hard to swatch the colour on my hand but it's so beautiful in person!
 
They're real mascara - if you know anything about makeup then you'll know about this product. Number 1 best selling mascara,my holy grail product. This mascara does get a lot of mixed reviews but personally I love it! Perfect name for a mascara as it just makes your lashes look so fake without going to the effort of wearing falsies. I love it! 

Ooh la lift - since the whole Kim K highlighting under eye trick I've been obssesed with anything that promises to highlight and lift the eyes. Ooh la lift is an 
under-eye brightening boost that's like "an instant eyelift" it claims and I'm excited to give it a go. It contains raspberry extracts and light-reflecting pigments to help instantly perk up tired eyes,and who doesn't want that?! 
 
Sun beam - 'liquid sunshine in a bottle' I saw it referred to as before and since I've been longing to try it! A golden bronze highlighter that gives you a natural, sunkissed radiance. The product has a neutral yellow undertone that means it's suitable for most skin tones that want a bronzed look. Can be used on the cheekbones,brow bone or Cupid's bow for the sun kissed,highlighted look,or down the front of the legs to make them look longer,toned and just generally amazing! Sun beam could also be mixed with your foundation to give a dewy look to the skin 

Lolli tint - during the warmer months I much prefer to wear a more cream/liquid blush as powders just feel too heavy. Lolli-tint is a smudge proof stain for the cheeks and lips that lasts for hours! The product has a milky like texture and is an orchid shade with a pink undertone that gives you a perfect healthy glow. With it being liquid however it doesn't work too well with powder so I'd recommend using it with either a bare face or a bb cream/tinted moistureriser to guarantee a longer lasting effect 
 

Lolli-balm - the procduct i was most excited for! Referred to as 'Lolli-tints little sister' the balm conditions and hydrates while giving you a candy-orchid buildable colour. And it comes in the cutest pinky/purple metallic shiny tube,seriously what's not to love about it! It was quite hard to get a swatch as the colour is quite sheer but it's the perfect throwing on without even needing a mirror type lipstick 

I'm super excited to try this set out on my face and I hope you've fallen in love with it after seeing everything inside. 

What's your favourite benefit product and what do you love about them! 

Enjoy xx


Tuesday 19 August 2014

Rimmel ScandalEyes felt liner - Review

When I'm feeling like making a little more effort with my makeup I always think a cat eye makes the look a litte bit better 
The only problem is I find it ridiculously hard to find a product to use to create the wing.

I've tried everything from gel to liquid to pencil and nothing seems to go well. The only thing I can just about deal with is the felt liner and I'd only ever tried the Eyeko liner and a Collection liner,both of which after using for a few weeks would go slightly dry in product and the liner would wear off pretty quick throughout the day
While out shopping on the hunt for a felt liner I spotted the Rimmel ScandalEyes felt liner in superdrug for £5 and couldn't make up my mind if I wanted it,then while in boots I spotted it on offer for £3 and couldn't resist (I give in way too easy)
There's a choice between a thin felt for more precise lines or a thicker felt which does both thick and thin lines. I went for the thinner of the two as i wanted something that I could build up if needed and the pen was perfect for what I wanted! 
I decided to give it a test out last night and I think I've found my favourite felt liner! I went for a brown smokey look last night using the using the Urban decay vice 2 palette and then lined the water line with my Benefit high brow pencil (excuse my alien looking face)
I lined the lash line with the felt and then winged it out at the end. This can sometimes be a hard task for me but this made it so much easier than usual 
And then I added a few coats of mascara and I was done! 
I'm loving this liner so much,the colour lasts from the second you put it on until it comes off and so far it hasn't smudged and hasn't made my eyes water which is just a huge plus! (Speaking of huge my forehead looks bloody massive here) 
I'd definitely recommend this liner,especially if you're just begining with liner as it's just so easy to use! 

Enjoy x

Sunday 17 August 2014

How to - The Perfect Red Lip

I'm being very modest with the title of this post to be honest. This look is far from perfect on myself cause I have the weirdest shaped lips going. However if you have nice normal lips with an actual cupids bow,here's now to get a "perfect red lip" (the lighting was awful today and the only before picture I got looks like a mug shot..but never mind)
When it comes to any bright coloured lip you want the lips to look as smooth as possible. So before doing anything make sure your lips are nice and mousiturised,for this I used the EOS lip balm in blueberry (tastes like blueberry muffins,so good) (ps:that little mark above my lip that looks like herpies isn't,it's a stupid spot that's refusing to go away..not good) 
I blend that into my lip so they're not too wet and then start by lining the lips. This is a hard task for cupid bow-less people but I make an 'X' shape where the bow would be and the outline the rest of the lip,and then fill the lip on with the pencil. I used the models own lip liner in red for this.
Next it's time for the scary part. If you're really good with your hands or you're just abit lazy and can't be bothered to find a lip brush (that's me!!) then you can apply the colour straight from the bullet and hope for the best. If you prefer it to be super clean cut then make sure you use a brush to apply it to the lips. My personal choice for lipstick was Mac Ruby Woo,I love this colour cause it's a matte consistency on the lips and leaves the best finish in my opinion! But of course you can use your favourite red lipstick for this part! After applying the first layer I like to blot the lipstick to get rid of an excess and then apply another coat if needed.
You can always just leave the lip like this and you're finished. But if you don't want to be applying your lipstick every hour cause it's worn off then my favourite thing to do is to take a piece of 1 ply toilet roll and place that over the lips,then take a translusant powder and apply that over the tissue to set the colour down. For this I used the Mac Prep&Prime translusant powder 
And you're done!! I wore this look for about 3/4 hours and I may have done abit of eating/drinking and the colour stayed in place all day I was very pleased with the outcome! 

Enjoy xx


Saturday 16 August 2014

50's/Pin Up Girl tutorial

 After a long hard thing about if I wanted to do a 50's makeup tutorial or 60's tutorial I finally settled on a 50's,pin up girl look!
For this look I thought I'd used some of my makeup that I've had for ages but just forgotten about it instead of buying more of what I don't really need (it's gonna be hard) 
I started by priming my face with the Clinique super primer to get rid of the redness in my face,I then used the Bourjois healthy mix foundation in light vanilla,I used to love this stuff but I've found that it's abit yellow for my skin tone,however it worked quite well for this look! I then concealed all the rubbish parts of my face (quite a lot of it) with my Mac studio finish in nc20.
Next it's time to highlight and contour the face! I used the Gosh concealer pen in 01 light to highlight under the eyes,the bridge of the nose,the chin and the forehead and I then went onto contour the cheekbones,temples and chin with the Bourjois bronzing primer. I set all the makeup down then with my Mac prep and prime transparent powder.
Now time to add some colour to the face,I started with a little bronzer and used the smashbox halo bronzer,however it wasn't as bronzed as I wanted so I used the trusty nars casino! I gave my cheeks abit of colour with the seventeen blush stamp in a baby pink colour and then highlighted the cheeks with my mac mineralise skin finish in soft and gentle. I then set the whole look with the urban decay de-slick spray.
For eyebrows I think I went a little too heavy handed and gave myself some super heavy brows but we'll just ignore those shall we. For the brows I used the anastasia dip brow in auburn
Next it's time for the eyes,I started by priming them with benefit stay,don't stray,but you can just take whatever eyeshadow primer you usually use. I then took a big fluffy shadow brush and Buck from the urban decay naked 1 palette and took the colour through the crease to contour the eye basically. I then took strange from the naked 3 palette and took this colour on the lid and on the brow bone 
A pin up look wouldn't be complete without the signature cat eye liner. To create the wing I used the bobbi brown long wear liner in black ink and drew quite a long,thick line on the upper lash line,I then thought I'd try something abit different and took the collection gold liner from the little mix collection and drew a smaller wing on top of the black. I then lined the water line with benefit highbrow to make the eyes look bigger (I love this stuff) i also applied some eyelure lashes to complete the look and added abit of the Clinique high length mascara to the bottom lashes 
To complete the look I added the signature red lip to the look. I lined my lips with the models own red lip liner and then filled them in with limecrime red velvet gloss,this stuff is amazing it drys matte in like an instant it's so good! And finally I added abit of depth with the rimmel Kate moss matte lipstick in 107 and I was done. This look was so fun to create and I just love a red lip even if they're not very practical! 
Enjoy! x